Optical Dissolved Oxygen Meter Instructions
Quick start guide
Safety first!
Before you start testing, safety comes first:
- Never put yourself at risk — if unsure, don’t test.
- Bring a first aid kit just in case.
- Wear sturdy shoes, sun protection, and clothing that shields against sharp debris, broken glass, or plants.
- Choose testing sites with safe, stable access.
- On a boat? Use a lifejacket or personal flotation device.
Quick instructions
Your DO meter is ready to use right out of the box:
- Remove the storage cap with sponge and replace it with the cage-style cap.
- Power on the meter.
- Lower the probe at least 15 cm (6″) below the water surface in an area that avoids plants or algae. Try not to touch the probe membrane to anything that will affect the reading
- Wait 60 seconds, then record your reading. If the temperature is not stable yet, wait until it stabilizes and then record your reading.
- Remove the cage cap and gently blot the probe surface with the included cloth. If you suspect contaminants on the probe (algae, chemicals, road salts, ocean water, etc.), rinse with distilled or deionized water and then blot gently to clean and dry.
- Reinstall the storage cap.
Troubleshooting and quick tips
- Stuck in a mode? Power off and back on. If that doesn’t work, try removing and reinserting the batteries.
- Ensure the probe connector is tight and dry.
- If the storage sponge has dried out, add distilled or deionized water, rehydrate the membrane for 2 hours, then perform a calibration check.
Monthly calibration check
When to check: Monthly, after storage rehydration, or exposure to chemicals.
- Remove the cap and wipe the membrane dry.
- Replace the storage cap and leave the meter upright for 1 hour.
- Power on and wait 60 seconds for the system to stabilize.
- Check the reading: it should be 95–105%.
- Within range: The meter is still accurate.
- Out of range: Perform a full calibration.
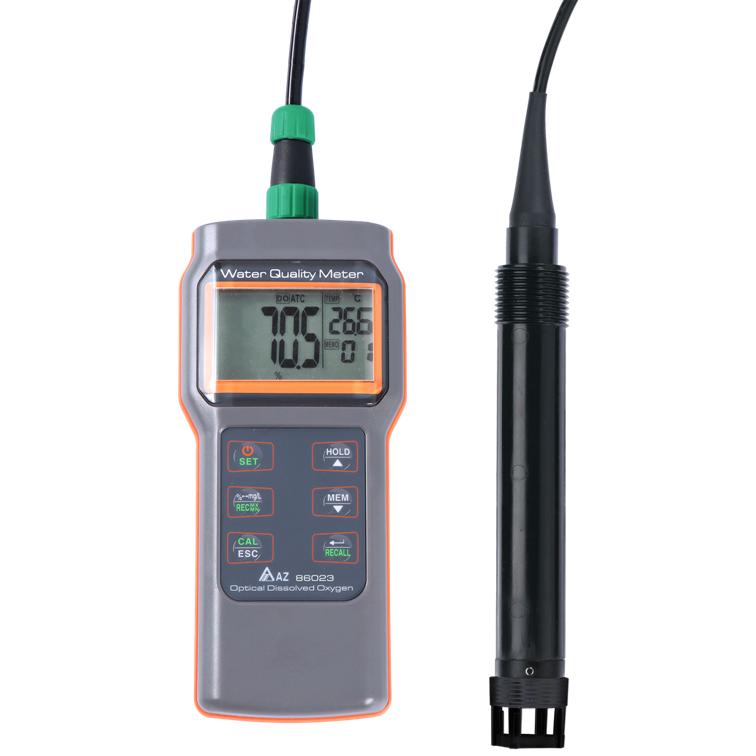
About your DO meter
What makes it great
Our optical (luminescent) DO meter uses advanced luminescent technology, meaning:
- No electrolytes or polarization voltage
- Long calibration life
- Low maintenance
It’s easy to use with automatic temperature compensation, and allows manual pressure and salinity adjustments. Compact and rugged, it’s perfect for on-site water testing.
What you can measure
| Measurement type | Details |
| D.O. concentration | Measured in mg/L (or ppm), with temperature compensation in place |
| D.O. saturation | Shown as a percentage of maximum possible oxygen at current temperature & pressure |
| Water Temperature | Displayed in °C or °F, used for DO auto-adjustment |
| Pressure | Enter in kPa for manual compensation |
| Salinity | Manual input (ppt) for use in salty conditions (>1 ppt) |
Handy features
- Waterproof (IP67)
- Multi-point calibration capability (0% and 100% DO calibration)
- Holds up to 99 readings in memory
- Displays low battery warnings
- Automatic shutoff timer (can be customized)
- Freeze/unfreeze screen (“Hold”)
- Max/Min tracking for peak readings
What you get
- Waterproof meter (IP67)
- Optical DO probe with 3 m cable & protective cap
- 6 × AAA batteries (≈10 hours of operation)
- Hard carry case
- Microfiber cloth
- Quick start manual
Probe care and maintenance
- Handle with care: Don’t twist or touch the black sensor tip.
- Hydrate: keep the sponge moist. Alternatively, if the sponge has dried before use, soak it for 2 hours in distilled or deionized water and perform a calibration check.
- Clean gently: rinse with distilled or deionized water; blot dry with a lint-free cloth.
- Store properly: keep the sponge damp and store it in its case, away from heat and sunlight.
Watch out for
- Don’t use around: Organic solvents (acetone, chloroform), bleach, hydrogen peroxide, chlorine (pool water!), sulfur dioxide — these can damage the probe.
- Safe with: CO₂, NH₃, H₂S, pH changes, and common ions like chloride or sulfate.
Setup and calibration
Connecting the probe
- Align the probe’s plug and socket.
- Push in firmly and twist the locking cap.
- Rinse and clean after every test—you can rinse the body safely, but don’t submerge the meter body.
Replacing batteries
- Unscrew the back cover.
- Remove 6 AAA batteries.
- Insert 6 new AAA batteries (same brand).
- Seal without overtightening—don’t damage the O‑ring.
Keypad basics
- Power/SET : setup key
- Short press = ON/OFF
- Long press = Setup Mode
- Automatic return after 20 seconds of inactivity
- Unit/MX MN : Switch DO units or enter max/min tracking
- CAL/ESC : Long‑press for calibration mode, short to cancel
- HOLD/UP : Freeze/unfreeze screen or increase values
- MEM/DOWN : Log the current reading or lower values
- Enter/RECALL : Long‑press to review saved readings
Understanding the display
- DO: Shows dissolved oxygen values
- ATC: Auto temperature compensation active
- TEMP/°C/°F: Current temperature
- ppt: Salinity enabled
- kPa: Pressure compensation
- CAL: In calibration mode
- MAX/MIN: Max/min tracking active
- HOLD: Reading is frozen
- MEMO: Reviewing saved readings
- Battery icon: Time to change batteries
- Number: Memory usage count
Measurement procedure
Before you begin
- If needed: rehydrate probe (first use or after long storage)
- Soak probe tip in distilled or deionized water for 2+ hours.
- Check calibration accuracy after rehydration
- Clean and inspect
- Rinse off visible salt/mineral/biofilm buildup with distilled or deionized water.
- Blot dry with the included microfiber cloth or similar.
- Never touch or scratch the sensor tip.
- Protect the tip
- Always use the anti-collision cage during use.
- Store with the moistened sponge cap when not in use.
Measuring dissolved oxygen
- Power on
- Plug in the probe (if not installed), then press power button. A 6-second countdown starts.
- Stabilize temperature
- Submerge the probe at least 6″ (15cm) below the surface.
- Wait up to 5 minutes for temperature equilibration. Usually will only need 60 seconds.
- Take reading
- Wait another 60 seconds after temperature stabilized, then record the measurement.
- You can press HOLD to freeze the reading.
- Switch units (if needed)
- Press the unit key to toggle between mg/L and % saturation.
Data recording and viewing
- Save Reading: Press HOLD to store (max 99 records).
- Recall Saved Data: Hold RECALL, use ▲/▼ to scroll.
- View Max/Min: Hold to show MAX, press again to show MIN, press once more to exit.
Cleaning after use
- Post-test cleaning
- Rinse with distilled or deionized water.
- Blot dry gently.
- Use storage sponge cap if storing.
- Advanced cleaning
- For algae or biofilm: use soft brush carefully or warm soapy water + sponge.
- For mineral scale: soak overnight in vinegar, then rinse.
- Always perform 100% calibration after vinegar soak. (see next section).
Calibration summary
Monthly calibration check
- Dry the sensor, insert into moistened sponge cap.
- Leave standing upright for 1 hour (meter off).
- Power on → wait 1 min → check reading.
If your reading is less than 95.0% or more than 105.0%, perform a 100% calibration. If your reading is less than 90% or more than 110%, perform both the 100% and the 0% calibration.
100% calibration
- Press & hold CAL
- → select P8.0
- → set to “Yes”
- → Enter.
- Allow to run, then perform calibration check.
0% calibration
- Use fresh sodium sulfite solution. Can be made or ordered.
- Soak for 5 min in an oxygen-free environment.
- Press and hold CAL
- → select P9.0
- → set to “Yes”
- → Enter.
- Allow to run, then perform a calibration check. Should read 95-105% after this step.
Setup options
| Code | Setting | Default | Notes |
| P2.0 | Memory All Clear | No | Clears all 99 stored readings |
| P3.0 | Salinity Compensation | ON | Enable for saltwater testing |
| P3.1 | Salinity Value (ppt) | 0.0 | Set manually for accurate results |
| P5.0 | Auto Sleep Time (min) | No | Select 15, 30, 45, or 60 min |
| P6.0 | Temp Unit | °C | Choose °C or °F |
| P7.0 | Factory Reset | No | Resets all settings |
Troubleshooting
First step for all errors:
Check that batteries are properly installed or replace with new AAA batteries. Many errors can result from low voltage.
| Issue | Fix |
| Unstable readings | Clean probe, allow temp to stabilize, check sample quality |
| D.O. too low | Enable salinity comp, clean probe |
| Wrong temperature reading | Ensure probe is ≥6″ (15cm) submerged |
| Poor 0% calibration | Rinse, soak probe in distilled or deionized water 30 min x 2 |
Error code summary
| Error Code | Meaning | Recommended action |
| E01 | Probe not detected | Power off the meter. Check probe connection. Reconnect and power on. If unresolved, contact seller for service. |
| E02 (Temp.) | Temperature too low (< 0 °C) | Allow probe to rest at room temperature for 30 minutes. If error persists, contact seller. |
| E03 (Temp.) | Temperature too high (> 40 °C) | Let probe cool down at room temp for 30 minutes. If unresolved, contact seller. |
| E02 (D.O.) | Dissolved Oxygen too low (below range) | Check probe condition. Recalibrate if needed. Contact seller if issue persists. |
| E03 (D.O.) | Dissolved Oxygen too high (above range) | Check probe condition. Recalibrate if needed. Let probe stabilize at room temp. Test again. If unresolved, contact support. |
Helpful tips
- Room temperature = ~20–25 °C.
- Always inspect the probe’s cleanliness and condition when errors occur.
- If issues persist after battery check and temperature stabilization, perform a calibration check.
Warranty summary
- 1-Year limited warranty – Meter body only.
- Probes, sensors, batteries = not covered.
- Damage from misuse or improper care voids the warranty.