Setting up a monitoring program
Step 1: Defining your objective
The most important part of setting up your monitoring program is to understand the reason you’re monitoring, or what problem you are studying. Make sure you know your own or your group’s goal/objective before you choose your sampling sites sites.
Most Water Rangers’ volunteers are testing water in order to fill data gaps for under-monitored or unmonitored water bodies. Their objective is to collect baseline water quality, which provides general information on water health and allows us to analyze trends over time.
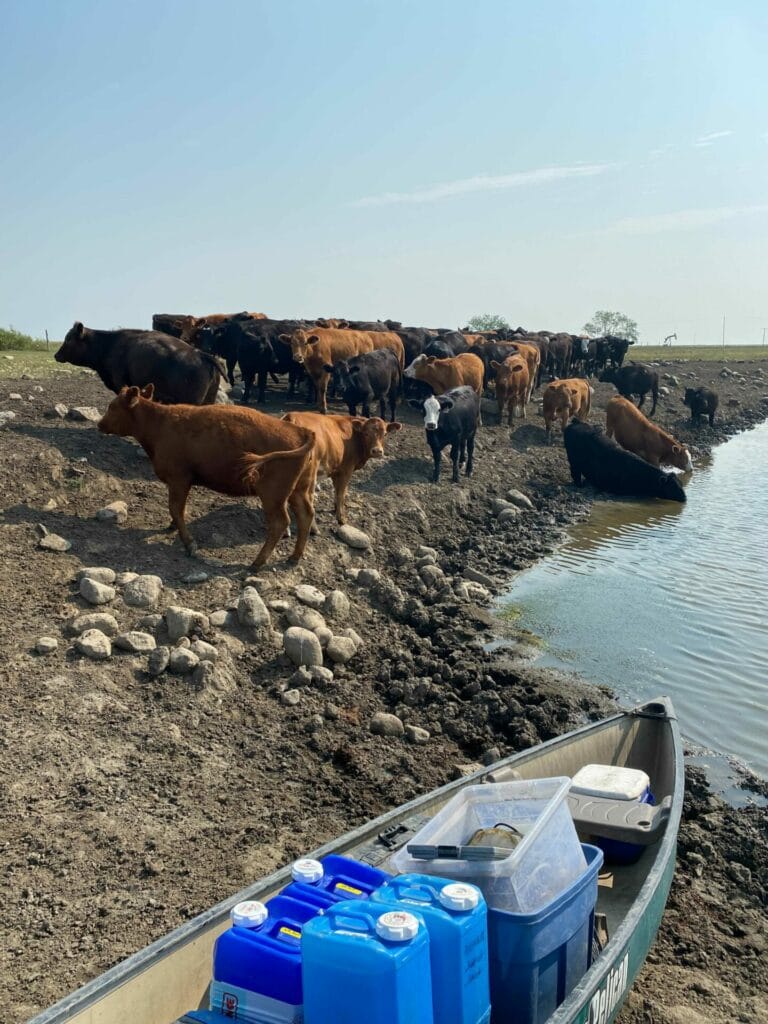
Others, such as our volunteers in Saskatchewan, have a more specific objective, such as the impact of agricultural runoff on nutrient levels in cow dugouts.
Here are some other examples of monitoring program objectives:
General/Broad objective
Collect baseline water quality in an under-monitored or unmonitored watershed to understand basic health of water body. Samples locations in this case are the mouths of watercourses, the middle of lakes, and off shore sites, with monitoring frequency 1 time per month minimum with 5 sets of observations collected per season.
More specific objective
An example of a specific or refined monitoring objective would be to determine is your watershed is impacted by road salts. In this case, the monitoring program’s sites are chosen accordingly so that they capture road salt flushing in surface water during rain or snowmelt events. They monitor parameters associated with road salts, such as chloride and conductivity, and interpret their results against existing criteria or guidelines.
Established objective
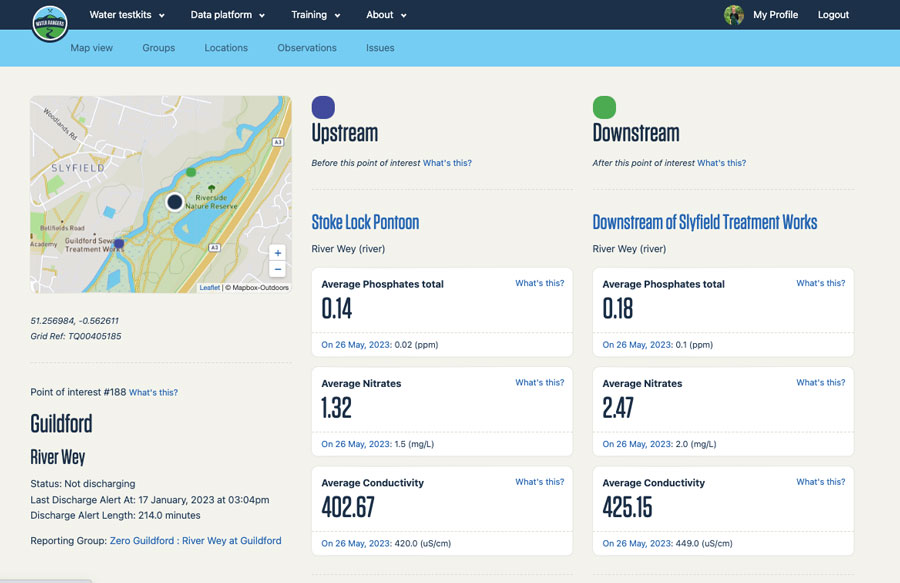
Samples collected monthly to measure for total phosphorus and E.coli to determine if agricultural activity or sewage in the watershed increases nutrient or contaminant levels. In this case sample sites are established upstream and downstream of farm or sewage outfall. Check out our new Points of Interest feature on upstream and downstream sampling.
Everything you need to know about using your testkit can be found in your field guide, which comes with your testkit. If flipping through the field guide isn’t quite your style, check out our training videos here!
When you use one of our kits, you’re encouraged to follow our testing protocol. Don’t worry though, this isn’t as scary as it sounds! Our tools, platform, and protocol are designed to be used by anyone, no matter their age or level of expertise.
If you’ve started to test and are interested in connecting with others in your region, join our Water Rangers Testers Facebook page.
If you have any questions, feel free to contact us!
Helpful links
- Guidance manual for optimizing water quality monitoring program design, Canadian Council of Ministers of the Environment.
- Knowledge hub, Atlantic Water Network, Nova Scotia.
- Make a plan, Catchment Systems Thinking Cooperative, United Kingdom.
- Surface water quality stewardship toolbox, Community-based Water Monitoring: Start Up Guide, Ministry of Environment and Climate Change Strategy, British Columbia.
Step 2: Choose a sample location
Once you have your objective, here are some other things to consider while choosing your sites:
- Your sites should be chosen because they help you meet your monitoring objective
- Your sites should be representative of the area under study.
- Your sites should be safe and offer safe access to the water.
- Your sites should not be on private property, unless you have permission
- Your sites should not duplicate other people’s work. Check Water Rangers map or DataStream for existing monitoring programs or sites to avoid duplication
- Can you get back to this site regularly and safely?
The following are general considerations for site selection:
Test site location guide
| Site type | Sampling location details |
| Mouth of watercourses | Sampling at the mouths of watercourses can reflect all upstream inputs. Upstream of tidally influenced areas can capture freshwater conditions. When sampling in a river, stream, creek, channel mouths, etc. start downstream of your sampling location then move into place. You are aiming for a spot mid-stream, facing the current. Be mindful of disturbing sediment at the bottom. |
| Watercourses – midstream | When sampling in a river, stream, creek, channel, etc. start downstream of your sampling location then move into place. You are aiming for a spot mid-stream, facing the current. Be mindful of disturbing sediment at the bottom. |
| Shore (freshwater or marine beach) | Start by wading out into the water until you are about 0.5-1m deep. You want to be facing the current (i.e. facing the waves). Be mindful of disturbing sediment at the bottom. See water safety page for beach safety. |
| Deepest point in lake (boat) | Sampling the deepest point of a lake reflects overall lake conditions. You’ll need to access this site by boat (motor or paddle). When sampling by boat, your first step is to move the boat to the sampling location. Reacher sticks and sampling poles are great tools for sampling from a boat. |
| Bridge | Sampling from a bridge, especially if there is traffic, requires extra safety precautions. If arriving by vehicle, park on the shoulder near the bridge and turn on vehicle hazard lights. Wear a reflective safety vest. Tests should be conducted from the centre of the bridge. You’ll very likely need a reacher stick, sampling pole or rope to reach the water. |
| Pier or dock | Start by walking out to the end of the pier or the dock. From the end of the pier or dock, face the current. The reach stick is a great tool when sampling from a dock or pier. |
| Upstream and downstream combination- Near suspected or known contamination points | In this case you would have two sample locations: upstream (control) and downstream (influenced by contamination). Choose a location upstream of the activity or impact of concern (sewage/stormwater outfall, roadsalt source, eroding streambanks or agricultural activity), or input (e.g., tributary). The second site is located downstream of the activity or impact of concern. By comparing water quality at the two sites and looking at trends over time we can isolate an impacted area or the impact of the activity of concern (e.g., industrial projects, resource extraction, sewage outfalls, etc.) |
Ask an expert: Tips on taking good samples
Melanie Dodd-Moher from Mississippi Valley Conservation Authority (3:19)
Step 3: Make a schedule
Testing in regular intervals helps us understand water health, so you should create a schedule that you can follow! Follow official testing days, or choose higher frequency (weekly) during your area’s testing season (usually late spring through early fall). Less sites done consistently give us better baselines, but if you can’t revisit a spot often, that’s okay! You won’t be able to see trendlines until you revisit the same spot, however.
Official testing days
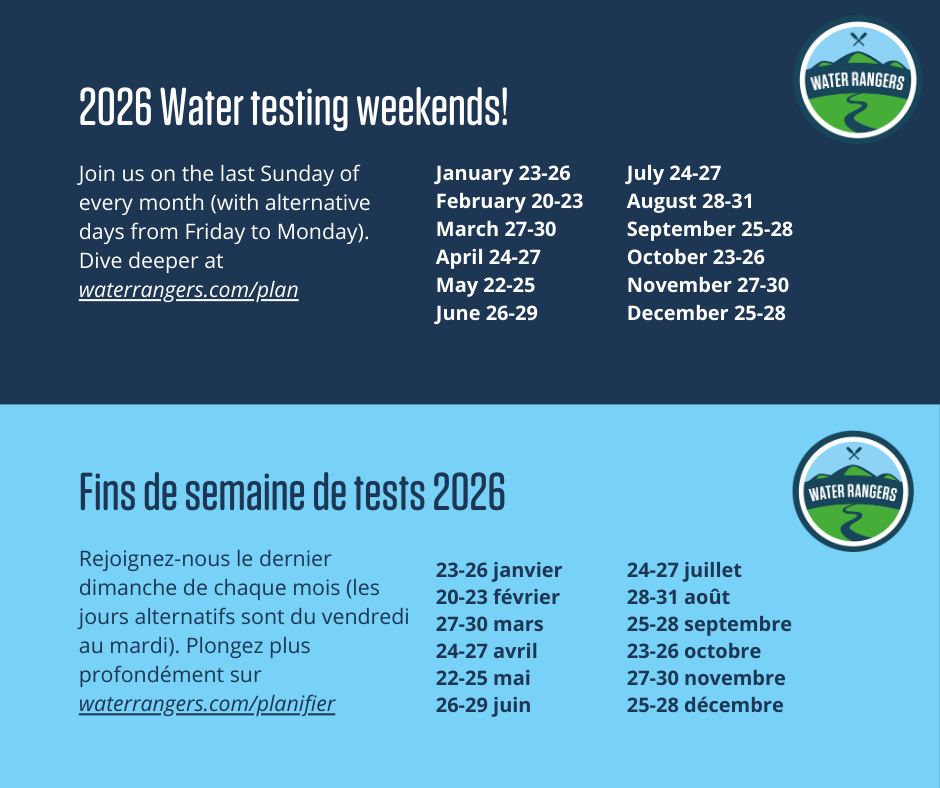
Testing happens throughout Canada on the last Sunday of every month (back-up days are Friday, Saturday, and Monday of the same weekend). When you sign up for our newsletter, we’ll send you a monthly reminder!
Testing while travelling
Many testers also take their kits on holiday with them! We’ve packed the whole kit into our suitcase, and everything but dissolved oxygen went through carry-on. It’s a great way to see new lakes and visit new places!
Step 4: Get equipped and trained
We have resources to help you choose which equipment is best for your monitoring objective. If you still need help choosing what’s best for you, reach out to us!
Step 5: Sharing your data
Caring for and sharing your test results is critical to ensuring your data is findable, useful, and used. Water Rangers has free digital data management tools to help you with that. Water Rangers is an advocate for a culture of good water data stewardship. To this end, we’ve aligned our data structure with the US Water Quality Exchange (WQX)’s data standard. WQX is an implementation of the ESAR (Environmental Sampling, Analysis and Results) data standard, and is widely used in environmental monitoring (project funded by the Digital Research Alliance of Canada). Learn more about why we believe in open data.
Your observations help fill information gaps on water bodies. Your observations also help inform decisions and solutions needed to restore and protect our waters. Water data help us see trends and develop an understanding of water health over time.
Your observations can’t do all these incredible things if they aren’t properly managed and shared. When your observations are shared on Water Rangers’ data platform, this facilitates the reuse of and access to your data for communities, decision-makers, and research bodies.
Manage and share your test results using our free data management tools:
- Water Rangers’ data platform on your computer: Log in to share and manage your data via our open data platform data.waterrangers.com.
- Water Rangers’ field apps: Enter your data right from the field using your smartphone! This ensures your observations are managed and shared on our data platform immediately. You can download the iOS version from the App Store here and the Android app here.